| Motor Module Guide |
|
||
| chil home > projects > ACT-R/PM > documentation > | |||
A guide to understanding and using ACT-R/PM's Motor Module.
The Motor Module (MM) functions as ACT-R's hands. Thus, since most output (e.g. key presses and mouse clicks) in using a computer interface are manual, they will go through the Motor Module. The Motor Module is conceptually based on EPIC's Manual Motor Processor (Kieras & Meyer, 1996) and is quite similar in many respects.
The Motor Module receives commands from the Cognition Layer to perform actions through the standard +manual> interface (specific commands and their parameters can be found in the Command Reference section of this document). In general, movement specification requires specification of a movement type, called a style (which is specified by the command name) and one or more parameters, such as the hand/finger that is to make the movement.
When a command is received by the Motor Module, the MM goes through three phases: preparation, initiation, and execution. In the preparation phase, the MM builds a list of "features" which guide the actual movement. The amount of time that preparation takes depends on the number of features that need to be prepared--the more that need to be prepared, the longer it takes.
The Motor Module has a small buffer which contains the last set of features that it prepared. The actual number of features that need to be prepared depends upon two things: the complexity of the movement to be made and the difference between that movement and the previous movement. On one end of the scale, the Motor Module is simply repeating the previous movement, then all the relevant features will already be in the buffer and will not require preparation. On the other end, the Cognition Layer could specify a movement that requires a full five features and they may not overlap with the features in the Motor Module's buffer, in which case all five features would need to be prepared.
Movement features are organized into a hierarchy, with the movement style at the top of the hierarchy. If the movement style changes, then all of the features required for a movement must be prepared over again. Then, if the movement styles are the same but the hand for the movement differs, all features at and below the hand level require preparation.
When feature preparation is complete, the Motor Module makes the specified movement. The first 50 ms of the movement is movement initiation. During this interval, the preparation state becomes FREE and the MM's processor and execution states become BUSY. After initiation ends, the processor state becomes FREE. The amount of time that a movement takes to execute depends on the type and possibly the distance the movement will traverse. Simple movements have a minimum execution time (the parameter :burst-time) and more complex movements (such as pointing with the mouse) have a longer execution time based on Fitts Law.
Here are the state transitions for a single movement:
| Preparation state | Processor state | Execution state | When |
|---|---|---|---|
| FREE | FREE | FREE | Before event arrives |
| BUSY | BUSY | FREE | When event is received |
| FREE | BUSY | BUSY | When preparation is complete into first 50 ms of movement |
| FREE | FREE | BUSY | +50 ms into movement |
| FREE | FREE | FREE | When movement is complete |
The Motor Module can only prepare one movement at a time (though it can be preparing features for one movement while executing another). If the Motor Module is in the process of preparing a movement and another request is sent, the later request will be ignored and the Motor Module is said to be "jammed." RPM will print an error message if this occurs. The way to avoid jamming the Motor Module is to include a left-hand side test of the Motor Manager's state, which would look like:
=manual-state>
   isa          module-state
   preparation  free
If the Motor Module is preparing a command, the preparation attribute will be busy, not free, so this test will fail and the production issuing the command will wait to fire until the Motor Module is done preparing the current command.
There is also a processor flag associated with each Module, which is made use of by the Motor Module. The processor flag is set to BUSY during the first 50 ms of the movement execution, which allows for a slightly more conservative approach to overlapping than testing the state of the preparation flag.
The Motor Module includes several movement styles, again based on EPIC's Motor Processor. They are:
More complex movements are typically built out of these movements. For example, the Motor Module has a move-cursor command, which is translated into a "ply." The Motor Module also includes a press-key command, which is translated into either a "punch" or a "peck-recoil" depending on the key.
Finally, it is possible to prepare movements in advance without executing them, and then execute them later. For instance, let's say the model is one of a subject doing simple reaction time: whenever anything appears on the screen, press the key under the right index finger. The time at which something will appear is unknown. To minimize RT, the movement can be prepared in advance with the PREPARE command. This requires a slightly different syntax:
!send-command! :motor prepare punch :hand right :finger index
If the screen object appears after preparation is complete, then the prepared command can be executed with the EXECUTE command and preparation time will be zero, thus minimizing the time between when the object appears and when the key is actually pressed.
The Motor Module includes a "virtual keyboard" in that all commands that should result in a keypress (e.g. punches and pecks) produce keystrokes that are sent to the environment, which is the attached MCL window. The virtual keyboard is based on the Apple Extended Keyboard II, which has separate <return> and <enter> keys, the <enter> key being on the numeric keypad.
As mentioned, the press-key command assumes that the hands are in the "home row" position and translates from a specified key to either a punch or a peck-recoil. If the hands have been moved off of the home row, then the timing for all key-pressing routines may be off. The press-key command is included primarily as a programming convenience and does not represent an ACT-R theory of typing. In a more ideal theory of typing that included learning, the model would have to look at the keyboard to determine where each key is, then acquire chunks that say which keys map to which locations, then productions that handle these, and so on. Until then, press key should be able to handle most normal typing assuming a fairly skilled typist.
Of course, in many experimental situations, hands are not kept in the "home row" position and thus, using press-key won't work. In these situations, the set-hand-location command should be used at the beginning of the run to set the appropriate hand location and individual punch and peck commands should be used as necessary.
Doing this requires knowledge of the layout of the virtual keyboard. The virtual keyboard assumes the keyboard to be a two-dimensional array of keys, which is depicted below:
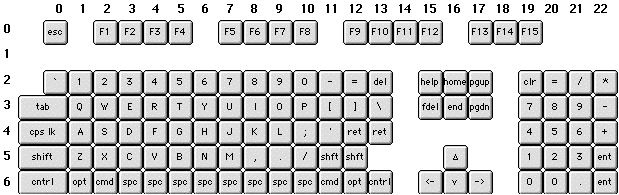
So, for example, if in an experiment the subjects will be pressing the <delete> key with their left hand, the way to handle this is to call (set-hand-location left 13 2) at the beginning of the simulation and then use punch left index to actually press the key. By default, the index finger has the same location as the hand and the other fingers are offset from that position. Thus, when starting up RPM, the left hand starts at (4 2) and the right at (7 2). There is a special location for the mouse, which is currently the location (28 2). The motor commands hand-to-mouse and hand-to-home will move the right hand from keyboard home row to the mouse and back--it is assumed for the sake of simplicity that the person being modeled uses the mouse with their right hand.
![]()
| People Facilities Research Projects Miscellany Search | Home |
Last modified 2005.01.26